 |
|
Using Peernet's TIFF Image Printer (9.0) with SharpEye
Overview
This page describes how to use Peernet's TIFF Image Printer (9.0)
with SharpEye.
There is a newer version
now and these directions are not accurate but most of the concepts are the same.
The Peernet TIFF Image Printer is mostly used to convert PDF files to images and then
those images are read by SharpEye
Newer versions of Peernet's product will probably work in the same or similar way.
What to Do
Peernet's TIFF Image Printer
The
Peernet TIFF IMage Printer costs $135.
Peernet's Raster Image Printer will also probably work but we
have not tested it with SharpEye recently.
The Raster Image Printer is more expensive and
can make other files besides TIFF files.
Peernet Settings for SharpEye
After installation, go to its Start menu submenu and run Properties... and
in there use the following settings:
- Save tab (picture of settings)
- Type: TIFF Serialized
- Dithering: Halftone
- Output Directory: it's up to you.
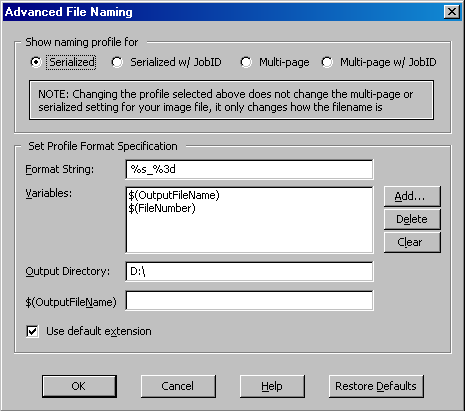
- Advanced File Naming (optional but recommended)
(picture of settings)
- Showing naming profile for: Serialized
- Format String: %s_%3d
- Variables: $(OutputFileName) and $(FileNumber)
- Output Directory = it's up to you.
- Check Use default extension
- Compression tab (picture of settings)
- Greyscale = High Quality JPEG
Use Batch process in SharpEye
Because the image files are already made, it is easiest to use Batch process...
which is under the Read menu.
Batch process allows you to select many image files at the same time to
recognize and then it puts them all together which is much easier than manually
putting the separate pages together.
Remember to:
- Make sure the image files are in the correct order in the File name field of the
Open dialog that is displayed after clicking Add files.
You may have to select the files in reverse order.
- Set your Output folder (so you know where the files are).
- Check Join files after conversion.
- Specify a good name for the joined file.
Back to Customer Page
|
| 1754
Quarry Lane, Suite DD, Phoenixville, PA 19460 P:
610 783-6692 F: 610 500-5072 |
|

